-
@SpringBootApplication组合注解里的@EnableAutoConfiguration注解里引入的自动加载配置的类@Import(AutoConfigurationImportSelector.class) -
自动配置文件中读取的
ServletWebServerFactoryAutoConfiguration配置类里有引入EmbeddedTomcat.class@Import({ ServletWebServerFactoryAutoConfiguration.BeanPostProcessorsRegistrar.class, ServletWebServerFactoryConfiguration.EmbeddedTomcat.class, ServletWebServerFactoryConfiguration.EmbeddedJetty.class, ServletWebServerFactoryConfiguration.EmbeddedUndertow.class }) public class ServletWebServerFactoryAutoConfiguration
-
EmbeddedTomcat类里是创建ServletWebServer的工厂配置类@Bean public TomcatServletWebServerFactory tomcatServletWebServerFactory() { return new TomcatServletWebServerFactory(); }
-
通过工厂模式创建tomcat
@Override
public WebServer getWebServer(ServletContextInitializer... initializers) {
	Tomcat tomcat = new Tomcat();
	File baseDir = (this.baseDirectory != null) ? this.baseDirectory : createTempDir("tomcat");
	tomcat.setBaseDir(baseDir.getAbsolutePath());
	Connector connector = new Connector(this.protocol);
	tomcat.getService().addConnector(connector);
	customizeConnector(connector);
	tomcat.setConnector(connector);
	tomcat.getHost().setAutoDeploy(false);
	configureEngine(tomcat.getEngine());
	for (Connector additionalConnector : this.additionalTomcatConnectors) {
		tomcat.getService().addConnector(additionalConnector);
	}
	prepareContext(tomcat.getHost(), initializers);
	return getTomcatWebServer(tomcat);
}
-
启动流程,记录几个比较重要的过程
Tomcat tomcat = new Tomcat();getTomcatWebServer(tomcat)new TomcatWebServer(tomcat, getPort() >= 0)initialize()this.tomcat.start();
谁调用getWebServer去启动的Tomcat呢,我们从启动流程说一下。
-
SpringBootApplication.run服务启动的主方法 -
调用的内部
ConfigurableApplicationContext.run方法public static ConfigurableApplicationContext run(Class<?> primarySource, String... args){ return run(new Class<?>[] { primarySource }, args); } public static ConfigurableApplicationContext run(Class<?>[] primarySources, String[] args) { return new SpringApplication(primarySources).run(args); }
-
刷新上下文
refreshContext(context);

refresh(context);

protected void refresh(ApplicationContext applicationContext) {
		Assert.isInstanceOf(AbstractApplicationContext.class, applicationContext);
		((AbstractApplicationContext) applicationContext).refresh();
}

onRefresh();//这里的调用选择 ServletWebServerApplicationContext 实现
-
创建WebServer
createWebServer();

WebServer webServer = this.webServer;
ServletContext servletContext = getServletContext();
if (webServer == null && servletContext == null) {
	ServletWebServerFactory factory = getWebServerFactory();
	this.webServer = factory.getWebServer(getSelfInitializer());
}

getWebServer() 选择 TomcatServletWebServerFactory 实现的接口
-
创建Tomcat Web容器。
这里就和上面我们讲的联系起来了,下面就是Tomcat的创建过程。
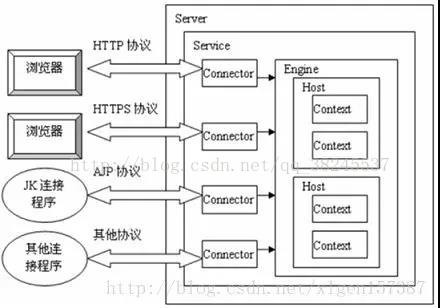
getWebServer这个方法创建了Tomcat对象,并且做了两件重要的事情:把Connector对象添加到Tomcat中,configureEngine(tomcat.getEngine());getWebServer方法返回的是TomcatWebServer。Tomcat中最顶层的容器是Server,代表着整个服务器,从上图中可以看出,一个Server可以包含至少一个Service,用于具体提供服务。
Service主要包含两个部分:Connector和Container。从上图中可以看出 Tomcat 的心脏就是这两个组件,他们的作用如下:
1、Connector用于处理连接相关的事情,并提供Socket与Request和Response相关的转化; 2、Container用于封装和管理Servlet,以及具体处理Request请求;
一个Tomcat中只有一个Server,一个Server可以包含多个Service,一个Service只有一个Container,但是可以有多个Connectors,这是因为一个服务可以有多个连接,如同时提供Http和Https链接,也可以提供向相同协议不同端口的连接,示意图如下(Engine、Host、Context下边会说到):
多个 Connector 和一个 Container 就形成了一个 Service,有了 Service 就可以对外提供服务了,但是 Service 还要一个生存的环境,必须要有人能够给她生命、掌握其生死大权,那就非 Server 莫属了!所以整个 Tomcat 的生命周期由 Server 控制。

spring boot 是如何启动 tomcat - login123456 - 博客园
Tomcat在SpringBoot中是如何启动的_Java_清风一阵吹我心-CSDN博客
SpringBoot内置tomcat启动原理 - 歪头儿在帝都 - 博客园
四张图带你了解Tomcat系统架构_Java_阿雨的博客-CSDN博客
其实在上面的getWebServer() 选择 TomcatServletWebServerFactory 实现的接口这里有疑问,为什么这里选择用Tomcat的实现,不选择其他的呢?虽然我们都知道Spring Boot的默认Web容器是Tomcat,但是如何确认呢。
这里就要结合自动配置这里的东西里。既然能自动引入Web配置在启动时选择Tomcat作为自己的默认启动容器,必然是和依赖的配置有关,我们找到了引入的Maven里spring-boot-starter-parent里的spring-boot-starter依赖,然后发现我们的Maven依赖里有这样的依赖引入。
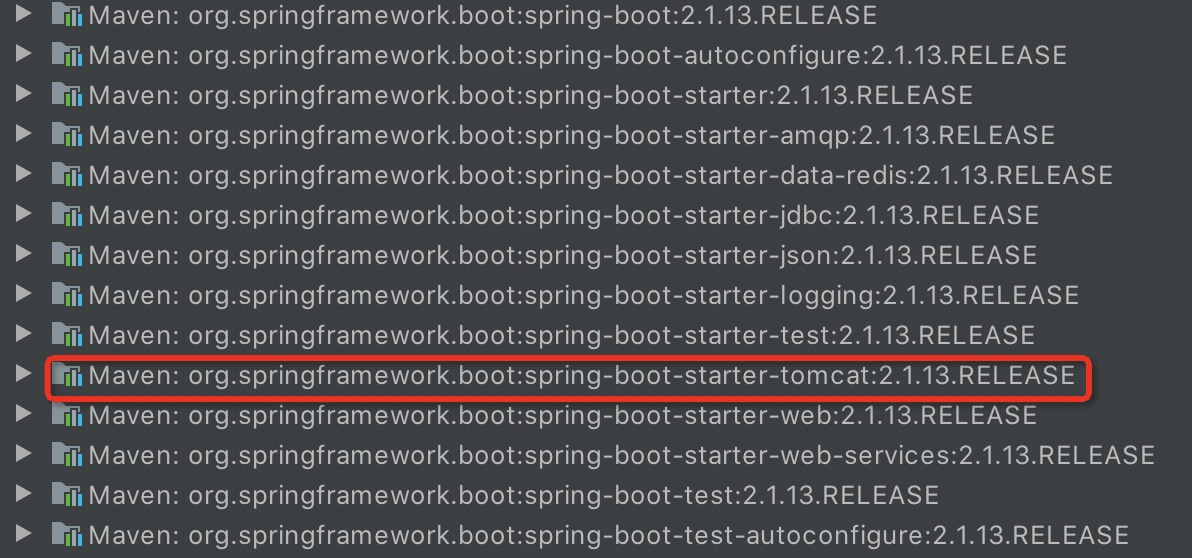
这必然就是spring-boot-starter引进来的,在启动时自动配置读到后知道了自己要选择Tomcat容器。
Spring Boot替换默认容器Tomcat_Java_实践求真知-CSDN博客
总结:
- 加载
META-INF/spring-autoconfigure-metadata.properties文件 - 获取注解的属性及其值(PS:注解指的是@EnableAutoConfiguration注解)
- 从classpath中搜索所有META-INF/spring.factories配置文件然后,将其中
org.springframework.boot.autoconfigure.EnableAutoConfiguration key对应的配置项加载到spring容器。只有spring.boot.enableautoconfiguration为true(默认为true)的时候,才启用自动配置,最终得到EnableAutoConfiguration的配置值,并将其封装到一个List中返回。 - 对上一步返回的List中的元素去重、排序。
- 依据第2步中获取的属性值排除一些特定的类,排除方式有2中,一是根据class来排除(exclude),二是根据class name(excludeName)来排除。
- 对上一步中所得到的List进行过滤,过滤的依据是条件匹配。这里用到的过滤器是
org.springframework.boot.autoconfigure.condition.OnClassCondition最终返回的是一个ConditionOutcome[]数组。(PS:很多类都是依赖于其它的类的,当有某个类时才会装配,所以这次过滤的就是根据是否有某个class进而决定是否装配的。这些类所依赖的类都写在META-INF/spring-autoconfigure-metadata.properties文件里)。
关键点:
ImportSelector该接口的方法的返回值都会被纳入到spring容器管理中SpringFactoriesLoader该类可以从classpath中搜索所有META-INF/spring.factories配置文件,并读取配置。同理,其实Spring框架本身也提供了几个名字为@Enable开头的Annotation定义。比如@EnableScheduling、@EnableCaching、@EnableMBeanExport等,@EnableAutoConfiguration的理念和这些注解其实是一脉相承的。
观察@EnableAutoConfiguration可以发现,这里Import了@EnableAutoConfigurationImportSelector,这就是Spring Boot自动化配置的“始作俑者”。
SpringBoot自动装配原理分析_Java_Dongguabai的博客-CSDN博客